
Introduction
It’s as good a time to be writing code as ever – these days, a little bit of code goes a long way. Just a single function is capable of performing incredible things. Thanks to GPUs, Machine Learning, the Cloud, and Python, it’s is easy to create “turbocharged” command-line tools. Think of it as upgrading your code from using a basic internal combustion engine to a nuclear reactor. The basic recipe for the upgrade? One function, a sprinkle of powerful logic, and, finally, a decorator to route it to the command-line.
Writing and maintaining traditional GUI applications – web or desktop – is a Sisyphean task at best. It all starts with the best of intentions, but can quickly turn into a soul crushing, time-consuming ordeal where you end up asking yourself why you thought becoming a programmer was a good idea in the first place. Why did you run that web framework setup utility that essentially automated a 1970’s technology – the relational database – into series of python files? The old Ford Pinto with the exploding rear gas tank has newer technology than your web framework. There has got to be a better way to make a living.
The answer is simple: stop writing web applications and start writing nuclear powered command-line tools instead. The turbocharged command-line tools that I share below are focused on fast results vis a vis minimal lines of code. They can do things like learn from data (machine learning), make your code run 2,000 times faster, and best of all, generate colored terminal output.
Here are the raw ingredients that will be used to make several solutions:
Using The Numba JIT (Just in time Compiler)
Python has a reputation for slow performance because it’s fundamentally a scripting language. One way to get around this problem is to use the Numba JIT. Here’s what that code looks like:
First, use a timing decorator to get a grasp on the runtime of your functions:
def timing(f):
    @wraps(f)
    def wrap(*args, **kwargs):
        ts = time()
        result = f(*args, **kwargs)
        te = time()
        print(f'fun: {f.__name__}, args: [{args}, {kwargs}] took: {te-ts} sec')
        return result
    return wrap
Next, add a numba.jit decorator with the “nopython” keyword argument, and set to true. This will ensure that the code will be run by the JIT instead of regular python.
@timing
@numba.jit(nopython=True)
def expmean_jit(rea):
    """Perform multiple mean calculations"""

    val = rea.mean() ** 2
    return val
When you run it, you can see both a “jit” as well as a regular version being run via the command-line tool:
$ python nuclearcli.py jit-test
Running NO JIT
func:'expmean' args:[(array([[1.0000e+00, 4.2080e+05, 4.2350e+05, ..., 1.0543e+06, 1.0485e+06,
        1.0444e+06],
       [2.0000e+00, 5.4240e+05, 5.4670e+05, ..., 1.5158e+06, 1.5199e+06,
        1.5253e+06],
       [3.0000e+00, 7.0900e+04, 7.1200e+04, ..., 1.1380e+05, 1.1350e+05,
        1.1330e+05],
       ...,
       [1.5277e+04, 9.8900e+04, 9.8100e+04, ..., 2.1980e+05, 2.2000e+05,
        2.2040e+05],
       [1.5280e+04, 8.6700e+04, 8.7500e+04, ..., 1.9070e+05, 1.9230e+05,
        1.9360e+05],
       [1.5281e+04, 2.5350e+05, 2.5400e+05, ..., 7.8360e+05, 7.7950e+05,
        7.7420e+05]], dtype=float32),), {}] took: 0.0007 sec
$ python nuclearcli.py jit-test –jit
Running with JIT
func:'expmean_jit' args:[(array([[1.0000e+00, 4.2080e+05, 4.2350e+05, ..., 1.0543e+06, 1.0485e+06,
        1.0444e+06],
       [2.0000e+00, 5.4240e+05, 5.4670e+05, ..., 1.5158e+06, 1.5199e+06,
        1.5253e+06],
       [3.0000e+00, 7.0900e+04, 7.1200e+04, ..., 1.1380e+05, 1.1350e+05,
        1.1330e+05],
       ...,
       [1.5277e+04, 9.8900e+04, 9.8100e+04, ..., 2.1980e+05, 2.2000e+05,
        2.2040e+05],
       [1.5280e+04, 8.6700e+04, 8.7500e+04, ..., 1.9070e+05, 1.9230e+05,
        1.9360e+05],
       [1.5281e+04, 2.5350e+05, 2.5400e+05, ..., 7.8360e+05, 7.7950e+05,
@click.option('--jit/--no-jit', default=False)
        7.7420e+05]], dtype=float32),), {}] took: 0.2180 sec
How does that work? Just a few lines of code allow for this simple toggle:
@cli.command()
def jit_test(jit):
    rea = real_estate_array()
    if jit:
        click.echo(click.style('Running with JIT', fg='green'))
        expmean_jit(rea)
    else:
        click.echo(click.style('Running NO JIT', fg='red'))
        expmean(rea)
In some cases a JIT version could make code run thousands of times faster, but benchmarking is key. Another item to point out is the line:
click.echo(click.style('Running with JIT', fg='green'))This script allows for colored terminal output, which can be very helpful it creating sophisticated tools.
Using the GPU with CUDA Python
Another way to nuclear power your code is to run it straight on a GPU. This example requires you run it on a machine with a CUDA enabled. Here’s what that code looks like:
@cli.command()
def cuda_operation():
    """Performs Vectorized Operations on GPU"""

    x = real_estate_array()
    y = real_estate_array()

    print('Moving calculations to GPU memory')
    x_device = cuda.to_device(x)
    y_device = cuda.to_device(y)
    out_device = cuda.device_array(
        shape=(x_device.shape[0],x_device.shape[1]), dtype=np.float32)
    print(x_device)
    print(x_device.shape)
    print(x_device.dtype)

    print('Calculating on GPU')
    add_ufunc(x_device,y_device, out=out_device)

    out_host = out_device.copy_to_host()
    print(f'Calculations from GPU {out_host}')
It’s useful to point out is that if the numpy array is first moved to the GPU, then a vectorized function does the work on the GPU. After that work is completed, then the data is moved from the GPU. By using a GPU there could be a monumental improvement to the code, depending on what it’s running. The output from the command-line tool is shown below:
$ python nuclearcli.py cuda-operation
Moving calculations to GPU memory

(10015, 259)
float32
Calculating on GPU
Calculcations from GPU [[2.0000e+00 8.4160e+05 8.4700e+05 ... 2.1086e+06 2.0970e+06 2.0888e+06]
 [4.0000e+00 1.0848e+06 1.0934e+06 ... 3.0316e+06 3.0398e+06 3.0506e+06]
 [6.0000e+00 1.4180e+05 1.4240e+05 ... 2.2760e+05 2.2700e+05 2.2660e+05]
 ...
 [3.0554e+04 1.9780e+05 1.9620e+05 ... 4.3960e+05 4.4000e+05 4.4080e+05]
 [3.0560e+04 1.7340e+05 1.7500e+05 ... 3.8140e+05 3.8460e+05 3.8720e+05]
 [3.0562e+04 5.0700e+05 5.0800e+05 ... 1.5672e+06 1.5590e+06 1.5484e+06]]
Running True Multi-Core Multithreaded Python using Numba
One common performance problem with Python is the lack of true, multi-threaded performance. This also can be fixed with Numba. Here’s an example of some basic operations:
@timing
@numba.jit(parallel=True)
def add_sum_threaded(rea):
"""Use all the cores"""
x,_ = rea.shape
total = 0
for _ in numba.prange(x):
total += rea.sum()
print(total)
@timing
def add_sum(rea):
"""traditional for loop"""
x,_ = rea.shape
total = 0
for _ in numba.prange(x):
total += rea.sum()
print(total)
@cli.command()
@click.option('--threads/--no-jit', default=False)
def thread_test(threads):
rea = real_estate_array()
if threads:
click.echo(click.style('Running with multicore threads', fg='green'))
add_sum_threaded(rea)
else:
click.echo(click.style('Running NO THREADS', fg='red'))
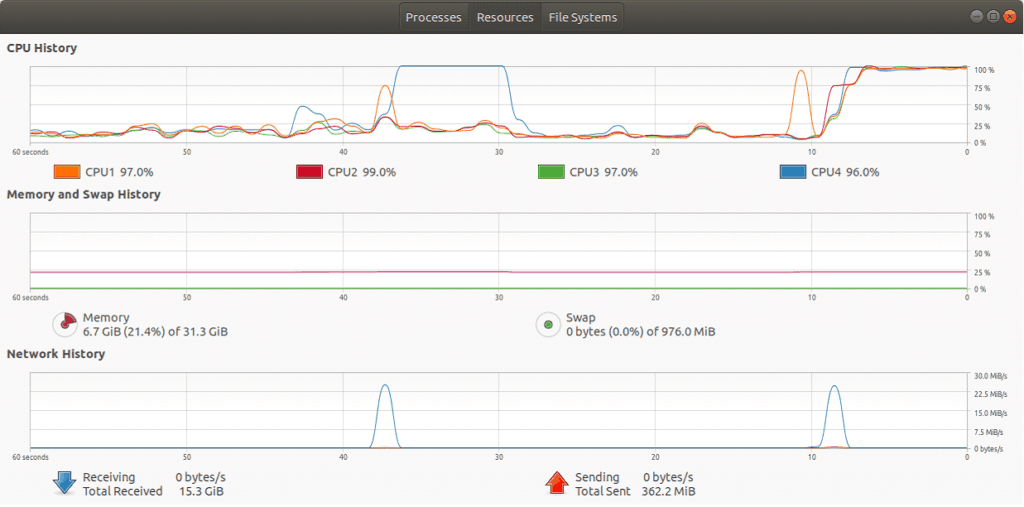
add_sum(rea)Note that the key difference between the parallel version is that it uses @numba.jit(parallel=True) and numba.prange to spawn threads for iteration. Looking at the picture below, all of the CPUs are maxed out on the machine, but when almost the exact same code is run without the parallelization, it only uses a core.
$ python nuclearcli.py thread-test
$ python nuclearcli.py thread-test --threads
KMeans Clustering
One more powerful thing that can be accomplished in a command-line tool is machine learning. In the example below, a KMeans clustering function is created with just a few lines of code. This clusters a pandas DataFrame into a default of 3 clusters.
def kmeans_cluster_housing(clusters=3):
    """Kmeans cluster a dataframe"""
    url = 'https://raw.githubusercontent.com/noahgift/socialpowernba/master/data/nba_2017_att_val_elo_win_housing.csv'
    val_housing_win_df =pd.read_csv(url)
    numerical_df =(
        val_housing_win_df.loc[:,['TOTAL_ATTENDANCE_MILLIONS', 'ELO',
        'VALUE_MILLIONS', 'MEDIAN_HOME_PRICE_COUNTY_MILLIONS']]
    )
    #scale data
    scaler = MinMaxScaler()
    scaler.fit(numerical_df)
    scaler.transform(numerical_df)
    #cluster data
    k_means = KMeans(n_clusters=clusters)
    kmeans = k_means.fit(scaler.transform(numerical_df))
    val_housing_win_df['cluster'] = kmeans.labels_
    return val_housing_win_df
The cluster number can be changed by passing in another number (as shown below) using click:
@cli.command()
@click.option('--num', default=3, help='number of clusters')
def cluster(num):
    df = kmeans_cluster_housing(clusters=num)
    click.echo('Clustered DataFrame')
    click.echo(df.head())
Finally, the output of the Pandas DataFrame with the cluster assignment is show below. Note, it has cluster assignment as a column now.
$ python -W nuclearcli.py cluster
| Clustered DataFrame | 0 | 1 | 2 | 3 | 4 |
| TEAM | Chicago Bulls | Dallas Mavericks | Sacramento Kings | Miami Heat | Toronto Raptors |
| GMS | 41 | 41 | 41 | 41 | 41 |
| PCT_ATTENDANCE | 104 | 103 | 101 | 100 | 100 |
| WINNING_SEASON | 1 | 0 | 0 | 1 | 1 |
| … | … | … | … | … | … |
| COUNTY | Cook | Dallas | Sacremento | Miami-Dade | York-County |
| MEDIAN_HOME_PRICE_COUNTY_MILLIONS | 269900.0 | 314990.0 | 343950.0 | 389000.0 | 390000.0 |
| COUNTY_POPULATION_MILLIONS | 5.20 | 2.57 | 1.51 | 2.71 | 1.10 |
| cluster | 0 | 0 | 1 | 0 | 0 |
$ python -W nuclearcli.py cluster --num 2
| Clustered DataFrame | 0 | 1 | 2 | 3 | 4 |
| TEAM | Chicago Bulls | Dallas Mavericks | Sacramento Kings | Miami Heat | Toronto Raptors |
| GMS | 41 | 41 | 41 | 41 | 41 |
| PCT_ATTENDANCE | 104 | 103 | 101 | 100 | 100 |
| WINNING_SEASON | 1 | 0 | 0 | 1 | 1 |
| … | … | … | … | … | … |
| COUNTY | Cook | Dallas | Sacremento | Miami-Dade | York-County |
| MEDIAN_HOME_PRICE_COUNTY_MILLIONS | 269900.0 | 314990.0 | 343950.0 | 389000.0 | 390000.0 |
| COUNTY_POPULATION_MILLIONS | 5.20 | 2.57 | 1.51 | 2.71 | 1.10 |
| cluster | 1 | 1 | 0 | 1 | 1 |
Summary
The goal of this article is to show how simple command-line tools can be a great alternative to heavy web frameworks. In under 200 lines of code, you’re now able to create a command-line tool that involves GPU parallelization, JIT, core saturation, as well as Machine Learning. The examples I shared above are just the beginning of upgrading your developer productivity to nuclear power, and I hope you’ll use these programming tools to help build the future.
Many of the most powerful things happening in the software industry are based on functions: distributed computing, machine learning, cloud computing (functions as a service), and GPU based programming are all great examples. The natural way of controlling these functions is a decorator-based command-line tool – not clunky 20th Century clunky web frameworks. The Ford Pinto is now parked in a garage, and you’re driving a shiny new “turbocharged” command-line interface that maps powerful yet simple functions to logic using the Click framework.
You can check out the code from this and other posts on this GitHub repository.
This article was originally published at Kite‘s blog and republished here as part of content partnership program. Kite is a plugin for your IDE that uses machine learning to give you useful code completions for Python. Available for Atom, PyCharm, Sublime, VS Code, and Vim.